Are you looking to connect your Namecheap domain to a WordPress website? Good news! In this comprehensive guide, we will walk you through the process of linking your Namecheap domain to the WordPress.com platform. By following these steps, you'll be able to seamlessly connect your domain and enjoy the benefits of a powerful content management system. Let's dive in!
 |
| Connect a Namecheap Domain to WordPress |
Connect Namecheap Domain to WordPress.com: A Step-by-Step Guide
Step 1: Add Your Domain to WordPress.com
Before you start configuring your Namecheap settings, you need to add your domain to your WordPress.com account. This process, known as domain mapping, allows WordPress.com to recognize and connect your domain to your website. Follow these steps:
- Sign in to your WordPress.com account.
- Go to your account settings or dashboard.
- Look for the option to add a domain or domain mapping.
- Enter your domain name (e.g., www.yourdomain.com) and follow the instructions provided by WordPress.com to verify ownership.
Step 2: Access Your Namecheap Account
Once you have successfully added your domain to WordPress.com, it's time to access your Namecheap account to make the necessary changes. Follow these steps:
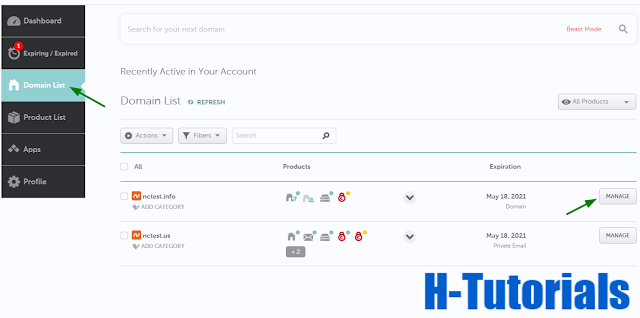
- Sign in to your Namecheap account.
- In the left sidebar, select "Domain List."
- Locate the domain you want to connect to WordPress.com and click the "Manage" button next to it.
Step 3: Configure Namecheap DNS Settings
Now that you're in the management interface for your domain, it's time to configure the DNS settings. This will ensure that your domain points to the WordPress.com platform correctly. Here's what you need to do:
1. In the "Nameservers" section, select the "Custom DNS" option from the drop-down menu.
2. Enter the following nameservers provided by WordPress.com:
ns1.wordpress.com
ns2.wordpress.com
ns3.wordpress.com
3. Save your changes by clicking on the green checkmark or the "Save" button.
2. Enter the following nameservers provided by WordPress.com:
ns1.wordpress.com
ns2.wordpress.com
ns3.wordpress.com
3. Save your changes by clicking on the green checkmark or the "Save" button.
Note: DNS changes may take up to 24-48 hours to propagate fully, so be patient.
Step 4: Configure Additional DNS Settings (If Needed)
If you have other services connected to your domain, such as email or subdomains, you may need to configure additional DNS settings within the WordPress.com platform. Here's what you can do:
- Go back to your WordPress.com account settings or dashboard.
- Look for the DNS configuration or DNS settings section.
- Follow the provided instructions to set up any necessary records, such as MX records for email or CNAME records for subdomains.
Conclusion:
Congratulations! You have successfully connected your Namecheap domain to the WordPress.com platform. By following the step-by-step guide outlined in this article, you can ensure that your domain points to your WordPress website seamlessly. Remember, it may take some time for the DNS changes to take effect fully, so allow up to 48 hours for the changes to propagate. Now you can enjoy the benefits of WordPress.com powerful content management system with your own custom domain. Happy blogging!
Tags
Hosting


